
Launching or re-designing a website or brand involves a lot of work. Whether you’re doing everything yourself or outsourcing to an agency like us, there’s a big checklist of images and assets to be created and uploaded. That includes all the imagery required for social networking profiles, but often an important but small part of website branding can be overlooked.
What is a Favicon?
A Favicon is the name given to the image which appears in locations relating to your website, such as an internet browser. It generally appears at a small size, just 16 x 16 pixels in the address bar and browser tab. But it’s important both in terms of usability for people to navigate to the right place when they have multiple tabs open, and also for branding and recognition.
If you’re using various popular CMS systems or website frameworks, you’ll also find that their developers use their own favicon by default, meaning that you’ll look less professional until you create your own – in the meantime you’re advertising their software and also displaying to customers and competitors what you’re using.
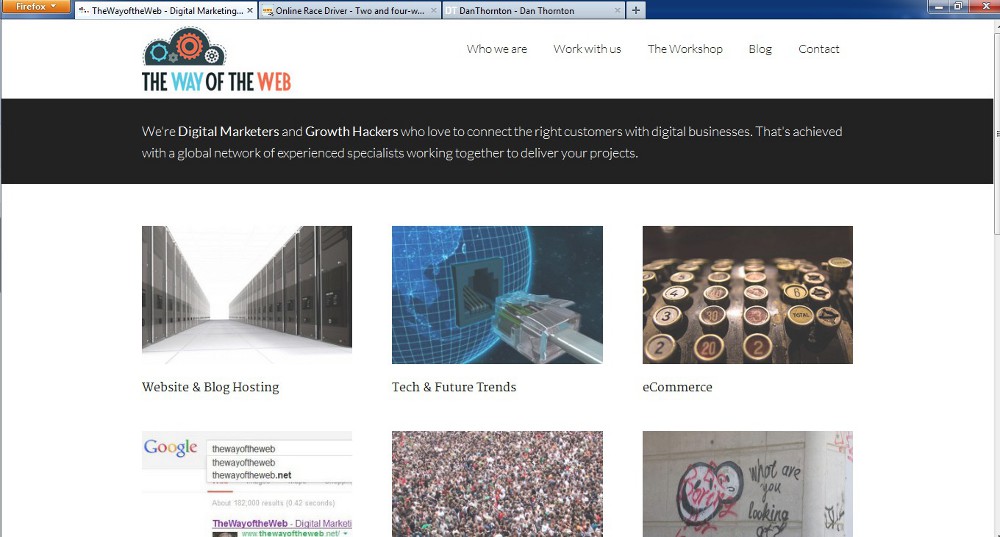
The good news is that any designer or developer should be aware of the need for a favicon. It’s certainly something we provide as a matter of course. It’s also relatively simple to create and upload for yourself if you are following a DIY approach or fancy making some changes.
Creating a favicon:
To generate your favicon you can either use any graphics or image editing software, or there are various online tools such as Faviconer.com, favicon.co.uk or Dynamic Drive.
We use either Photoshop, or the free, open source alternative, GIMP to create the image. Generally we start with a 64 x 64 pixel square to make it easier to edit and avoid issues when scaling down. Then when we’re happy, we’ll adjust the image size to 16 x 16 pixels.
It’s important to remember how small the favicon will be when displayed in a tab – in the case of this site, we considered that our logo was more important and recognisable than reworking the site logo to be bigger. The same held true for our gaming site OnlineRaceDriver.com, but I don’t have a logo for my personal blog, so I decided to pick my initials.
If you’re looking for inspiration, just take a look at what your favourite sites use. When designing website assets for clients we’ll include the favicon as part of the package, along with website logos, social media images etc.
When you’re happy with your work, you just need to save the result as favicon.ico. (It’s listed in GIMP as ‘Microsoft Windows icon).
Uploading your Favicon:
Some CMS systems, such as Magento, allow you to upload your favicon directly. All you need to do is visit System > Configuration, and then look under General to find Design and the HTML Head section.
For WordPress various plugins exist to offer similar functionality, but it’s actually fairly easy to upload your new favicon yourself. That way you avoid adding extra software to your site, and having to download updates etc, for the sake of a task you might only ever do once every few years.
After creating a favicon.ico and saving it to your desktop you’ll need to login to your website hosting either via your website host and any FTP manager they provide, or via your own FTP Client (e.g. Filezilla).
First navigate to the Theme you’re currently using for your site, and when you can view all the related files, remove the existing favicon.ico file and upload your creation.
You can also upload an additional copy to the main directory of your site, e.g. https://thewayoftheweb.net/favicon.ico to ensure the icon also appears in RSS feedreaders and other locations.
Finally if you want to be compatible across some older internet browsers, you may also wish to edit the header of your page.
- Go to your WordPress Administration Panel.
- Click on Appearance.
- Click on Theme Editor.
- Select the file called Header or header.php to edit the file.
- Search for the line of code that begins with <link rel=”shortcut icon” and ends with /favicon.ico” />. Overwrite it, if it exists, or add the following code below the <head> HTML tag.
<link rel=”shortcut icon” href=”<?php echo get_stylesheet_directory_uri(); ?>/favicon.ico” /> - Save the changes
And that’s it. When you’re making code changes, we’d recommend using a copy of the existing code and making sure you have a backup in the case of any problems.
You should start seeing your new favicon fairly quickly, although sometimes it can take some time to display due to various cache settings – generally more modern browsers are faster.


Recent Comments